Xcode UI Testing Tips & Gotchas
 With Xcode 7, Apple has added integrated support for automated UI testing. I recently tried adding UI test cases to an app and what I thought would be a relatively simple task of recording some clicks and keystrokes and tossing in a few asserts quickly became a multi-day tumble down a rabbit hole of bugs, Xcode quirks, and headaches.
Don't get me wrong, Xcode's UI testing tools are powerful, straightforward, and the integration with Xcode bots is great. However, they are also unsurprisingly rough in some places. To make matters worse, there is a stark lack of online documentation and examples.
This article will introduce some basic UI testing concepts, as well as offer tips for common issues you're likely to encounter (generally applicable to both OS X and iOS testing).
How Xcode's UI Testing Works
It tests what a user could
UI tests are designed to behave as though a user is interacting with your app. A user would have no notion of the underlying data structures or model classes that comprise your app's architecture, and your UI tests don't either. Your UI tests can verify basic properties of on-screen controls (such as their -value, -frame, or whether they -exist) but not much else (there are some exceptions to this however, such as -expectationForNotification:object:handler: which tests for NSNotifications).
UI tests are designed to behave as though a user is interacting with your app. A user would have no notion of the underlying data structures or model classes that comprise your app's architecture, and your UI tests don't either. Your UI tests can verify basic properties of on-screen controls (such as their -value, -frame, or whether they -exist) but not much else (there are some exceptions to this however, such as -expectationForNotification:object:handler: which tests for NSNotifications).
The accessibility layer is opt-in
In order to interact with your UI, each element needs to supply basic information to the accessibility framework. Cocoa controls include accessibility support "for free" (though in many cases you'll want to further customize the accessibility properties). However...
In order to interact with your UI, each element needs to supply basic information to the accessibility framework. Cocoa controls include accessibility support "for free" (though in many cases you'll want to further customize the accessibility properties). However...
Custom NSViews (and CALayers) are invisible
If you want to test a custom NSView, that view needs to make itself accessible (for example, by returning YES for -isAccessibilityElement and overriding the other properties specific to its accessibility role). For CALayers you'll typically have the containing view create NSAccessibilityElements for each layer. For more details see this Apple guide.
If you want to test a custom NSView, that view needs to make itself accessible (for example, by returning YES for -isAccessibilityElement and overriding the other properties specific to its accessibility role). For CALayers you'll typically have the containing view create NSAccessibilityElements for each layer. For more details see this Apple guide.
Common UI Testing Classes
XCTestCase - Wraps test methods and assertsXCUIElement - Represents a UI element (window, control, view, etc.)
XCUIElementQuery - Represents a query for one or more elements
XCUIApplication - An XCUIElement subclass which represents the test application
A point worth mentioning: XCUIElement does not actually represent a UI element but rather a query for that element. That is, you can create an XCUIElement which is a valid object but points to UI that does not exist. Likewise, an element on screen that you reference could disappear later, and attempting to interact with it when exists == NO will fail the test.
Leveraging XCUIApplication
XCUIApplication has a minimal API, but a few methods warrant special attention:-launch - By default, new XCTestCase templates include a line in -setup which instantiates a new XCUIApplication and launches it. When -launch is called, it will terminate any previously running instance of the target app. This means by default each test case you add will re-launch your app prior to each test method. You can avoid this by using a shared reference to a singular XCUIApplication that you -launch only once, however aside from overall test times there is not much advantage to doing so.
-launchEnvironment - Allows control over custom environment variables passed to the target app on launch. This can be used for (among other things) setting a custom variable your app can use to identify when it is running as the target for automated UI testing. Although this can be useful, it should be used judiciously. Your UI tests aren't very helpful unless they're exercising the same code your users will be.
UI Recording
 With Xcode 7, Apple has added a Record UI Test button which allows you to step through your UI and have those actions recorded for you in whatever current test case method you're editing. While this sounds great in theory, in practice I've found its current implementation to be buggy and unreliable. Here are some tips for using it:
Move in Slow-Motion - Performing your clicks and keyboard presses too quickly or in rapid succession may result in some of them being skipped over by Xcode.
Expect Errors - Recording will simply not work in some cases. Clicking the Don't Save button in an NSSavePanel will record a string with an escaped Unicode character that doesn't work. Many times, recording will fail with a general error message like the one below. Suggestion? Use recording sparingly as a starting point for writing your test cases 'from scratch'.

Don't Record Click-Drags - Why? Because they don't work. Even selecting a menu item by clicking, dragging to the item, and releasing the mouse will fail to record. (To record a menu item selection, click the menu, release the mouse, hover over the item, and click it separately.) For custom drags on elements you can programmatically write your own using XCUICoordinate or by adding a category method to XCUIElement. Example:
Tokens
When recording UI actions, there are many ways of referencing the same element. Xcode doesn't know which of these is the best way to express that query for your test, so it will tokenize these references to allow you to select other options if you desire.Unfortunately, tokens are currently quite buggy. Most interactions with them can have unexpected results. Typing with a token selected, for example, explodes it into gibberish. Even the Editor > Flatten Tokens menu item will potentially chop off important token elements unexpectedly.
Use with caution - I've not found any workarounds for the current bugs with UI recording tokens, but they can be avoided by writing your tests by hand (and using the UI recording only as a starting point), which will result in cleaner and more concise code anyways.
New in Xcode 7, exploding tokens:

Debugging
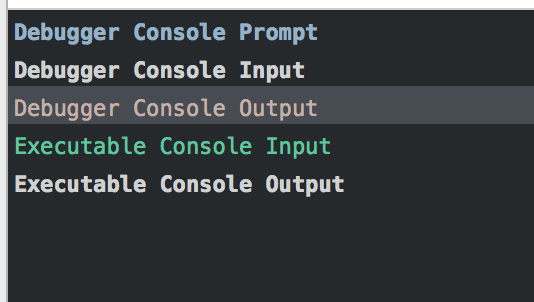
While debugging tests you'll find that your console is noisier than normal. As previously mentioned, XCUIElements represent queries, not hard links to UI components. As such, every time they're referenced the Accessibility framework works its way down the entire accessibility hierarchy in your app. This journey is logged to the console. It means that even when your target (and test) are paused, running a simple LLDB command will spit out a surprising amount of text, with your actual debugger output hidden somewhere in the mix.Customize your Console colors - The best way I've found of fixing this is to take advantage of Xcode's custom console color settings to set a custom color for Debugger Console Output vs. Executable Console Output. This will help the results of your debugger commands stand out from the noise.

UI Timeouts
Any action in your UI test cases must be resolved within 2.5 seconds. This is a hardcoded limitation that can't be changed. What does this mean?Main thread responsiveness - Your main thread run loop must return within 2.5s of any click, keyboard press, or other UI action or your test case will fail. If you've got code chewing up main thread cycles, this is a great chance to catch it and improve your app's UI responsiveness.
Wait for UI elements to exist - If you are waiting for some lengthy action to resolve before the UI may appear on screen, you can wait for an XCUIElement to exist. Here's an example:
Interruption Handlers
You may find that during testing you encounter failures as a result of system alerts on the screen. For example, this can happen when the user is prompted to allow location services, or on OS X if some other process crashes and the Finder displays a floating system alert to notify of the unexpected termination.These alerts can be surprisingly difficult to deal with. Apple has provided a hook to handle these alerts via the XCTestCase method -addUIInterruptionMonitorWithDescription:handler:. A simple example:
In my experience so far, Apple's interruption handlers are unreliable. While reproducing a crashed application alert on OS X I found that alerts already on screen when the UI tests started were only recognized (and the handler called) about half the time. Alerts that appeared during the test itself fared better but still not 100%, in many cases the handler was never called and the test failed as a result of the system alert floating unexpectedly over the UI being exercised.
It also appears that interruption handlers will not be called if your test is waiting for an expectation via -waitForExpectationsWithTimeout:handler:.
Documentation
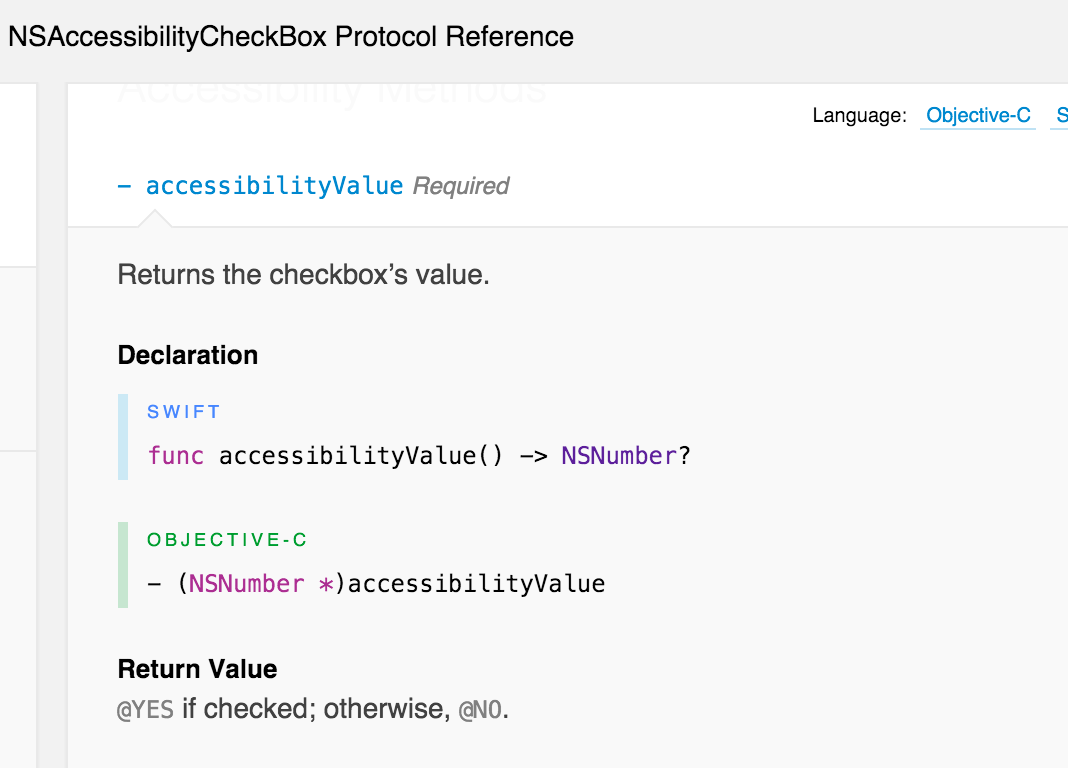
A cautionary note: if you plan on writing UI tests be prepared to learn by experimentation and trial-and-error. The documentation for the Accessibility frameworks and related XCTestCase classes is extremely thin in some areas, and online examples can be equally difficult to come by.In many cases the docs are simply wrong (ex: NSAccessibilityCheckBox documentation doesn't mention that Cocoa checkboxes will return @(2) for -accessibilityValue to indicate a mixed state, despite NSMixedState being defined as -1):

Or they're frustratingly vague:

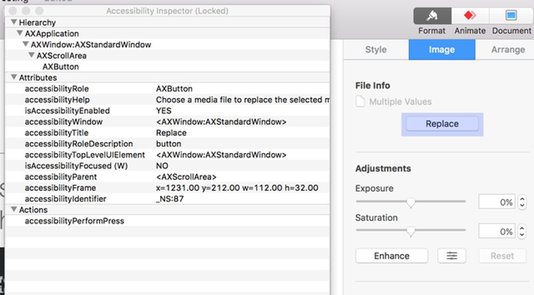
Accessibility Inspector
Using it is as simple as launching the app and hovering the mouse over any control or UI element of an accessible application. You can discover a great deal by examining Apple's own apps (the screenshot below shows the Accessibility Inspector locked after hovering over a button in Apple's Keynote application).

It also includes a verifier tool which is available by choosing Window > Accessibility Verifier. This tool will inspect the complete hierarchy of any running application and report missing properties, incorrectly implemented roles, and other accessibility problems. (It's worth mentioning that running this on Apple's own apps will often result in a plethora of warnings & errors, an indicator of how challenging the process of fully supporting accessibility can be.)